一、Redis3.0与3.2文件对比
1. clone redis
git clone https://github.com/antirez/redis.git
2. checkout分支
cd redis
git checkout 3.0
git checkout 3.2
3. 比较
(1) 比较3.0和3.2文件变化数

git clone https://github.com/antirez/redis.git
cd redis git checkout 3.0 git checkout 3.2
(1) 比较3.0和3.2文件变化数
> git rev-list 3.0..3.2 --count
1708
(2) 比较3.0和3.2文件变化统计
> git diff 3.0..3.2 --shortstat
比较3.0和3.2文件变化数
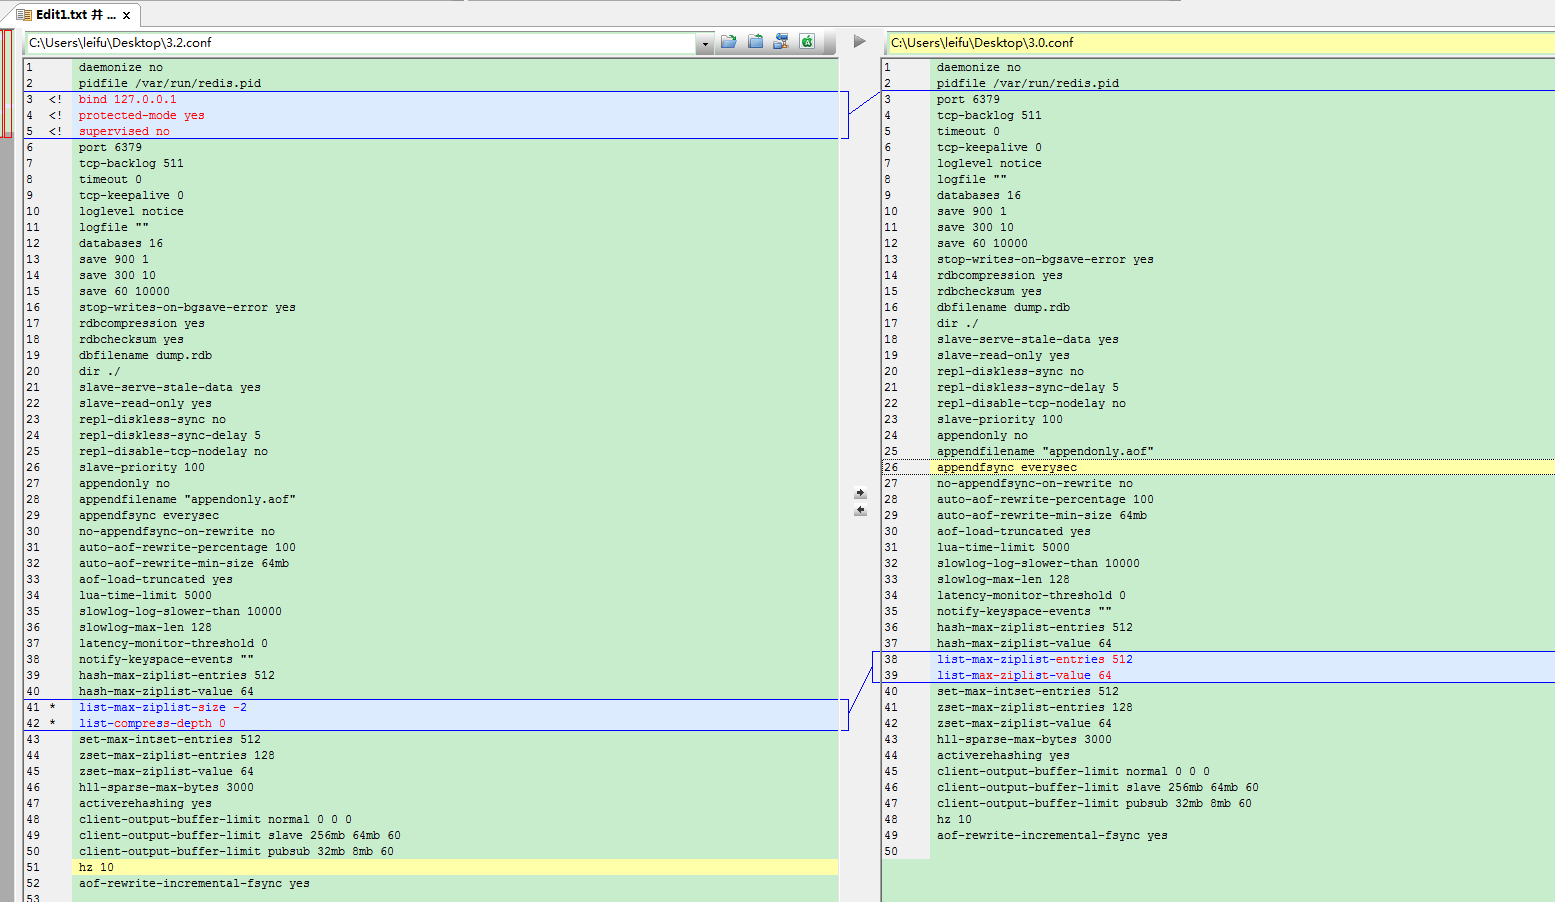
Redis3.2添加了两个配置:
Redis3.2修改了个配置:
有关list的优化,由配置一改为配置二,虽然还没详细了解,应该是list的底层数据结构做了一些新的变化或者优化。
配置一:
list-max-ziplist-entries 512
list-max-ziplist-value 64
配置二:
list-max-ziplist-size -2
list-compress-depth 0
配置三:
bind 127.0.0.1
bind在Redis3.2.0中默认改为127.0.0.1
# Protected mode is a layer of security protection, in order to avoid that
# Redis instances left open on the internet are accessed and exploited.
#
# When protected mode is on and if:
#
# 1) The server is not binding explicitly to a set of addresses using the
#    "bind" directive.
# 2) No password is configured.
#
# The server only accepts connections from clients connecting from the
# IPv4 and IPv6 loopback addresses 127.0.0.1 and ::1, and from Unix domain
# sockets.
#
# By default protected mode is enabled. You should disable it only if
# you are sure you want clients from other hosts to connect to Redis
# even if no authentication is configured, nor a specific set of interfaces
# are explicitly listed using the "bind" directive.
说明
用一段代码就可以说明什么是protected-mode
if (protected-mode && !requirepass && !bind) {
	Allow only 127.0.0.1,::1 or socket connections
    Deny (with the long message ever!) others
}
其实设置成默认是为了保护对redis不了解的人,提供安全性,但是对于对于不需要bind和requirepass的使用者(例如内网),需要将protected-mode设置为no
# If you run Redis from upstart or systemd, Redis can interact with your
# supervision tree. Options:
#   supervised no      - no supervision interaction
#   supervised upstart - signal upstart by putting Redis into SIGSTOP mode
#   supervised systemd - signal systemd by writing READY=1 to $NOTIFY_SOCKET
#   supervised auto    - detect upstart or systemd method based on
#                        UPSTART_JOB or NOTIFY_SOCKET environment variables
# Note: these supervision methods only signal "process is ready."
#       They do not enable continuous liveness pings back to your supervisor.
说明
可以通过upstart和systemd管理Redis守护进程,这个参数是和具体的操作系统相关的。
# By default, if no "bind" configuration directive is specified, Redis listens
# for connections from all the network interfaces available on the server.
# It is possible to listen to just one or multiple selected interfaces using
# the "bind" configuration directive, followed by one or more IP addresses.
#
# Examples:
#
# bind 192.168.1.100 10.0.0.1
# bind 127.0.0.1 ::1
#
# ~~~ WARNING ~~~ If the computer running Redis is directly exposed to the
# internet, binding to all the interfaces is dangerous and will expose the
# instance to everybody on the internet. So by default we uncomment the
# following bind directive, that will force Redis to listen only into
# the IPv4 lookback interface address (this means Redis will be able to
# accept connections only from clients running into the same computer it
# is running).
#
# IF YOU ARE SURE YOU WANT YOUR INSTANCE TO LISTEN TO ALL THE INTERFACES
# JUST COMMENT THE FOLLOWING LINE.
# ~~~~~~~~~~~~~~~~~~~~~~~~~~~~~~~~~~~~~~~~~~~~~~~~~~~~~~~~~~~~~~~~~~~~~~~~
bind 127.0.0.1
说明
bind在Redis3.2.0之前默认是0.0.0.0或者说””,为了保证不太了解Redis安全性的人,在Redis3.2.0中bind默认是127.0.0.1,也就是只有本机回环地址可以访问。如果需要配置sentinel、cluster或者需要机器机器可以访问该Redis实例请修改为0.0.0.0或者指定的内网IP.
(4).list-max-ziplist-size(默认-2)
# Lists are also encoded in a special way to save a lot of space.
# The number of entries allowed per internal list node can be specified
# as a fixed maximum size or a maximum number of elements.
# For a fixed maximum size, use -5 through -1, meaning:
# -5: max size: 64 Kb  <-- not recommended for normal workloads
# -4: max size: 32 Kb  <-- not recommended
# -3: max size: 16 Kb  <-- probably not recommended
# -2: max size: 8 Kb   <-- good
# -1: max size: 4 Kb   <-- good
# Positive numbers mean store up to _exactly_ that number of elements
# per list node.
# The highest performing option is usually -2 (8 Kb size) or -1 (4 Kb size),
# but if your use case is unique, adjust the settings as necessary.
(5).list-compress-depth(默认是0)
# Lists may also be compressed.
# Compress depth is the number of quicklist ziplist nodes from *each* side of
# the list to *exclude* from compression.  The head and tail of the list
# are always uncompressed for fast push/pop operations.  Settings are:
# 0: disable all list compression
# 1: depth 1 means "don't start compressing until after 1 node into the list,
#    going from either the head or tail"
#    So: [head]->node->node->...->node->[tail]
#    [head], [tail] will always be uncompressed; inner nodes will compress.
# 2: [head]->[next]->node->node->...->node->[prev]->[tail]
#    2 here means: don't compress head or head->next or tail->prev or tail,
#    but compress all nodes between them.
# 3: [head]->[next]->[next]->node->node->...->node->[prev]->[prev]->[tail]
# etc.
说明
Redis3.2.0引入了新的quicklist的数据结构做了list的底层存储方案。废弃了原来的两个配置参数,list-max-ziplist-entries和list-max-ziplist-value
127.0.0.1:6388> config get list-max-ziplist-size
1) "list-max-ziplist-size"
2) "-2"
127.0.0.1:6388> config get list-compress-depth
1) "list-compress-depth"
2) "0"
127.0.0.1:6388> lpush user_list u1 u2 u5 u7 u99 u10 u3
(integer) 7
127.0.0.1:6388> object encoding user_list
"quicklist"
在Redis3.2.0中设置原来的参数已经不生效了,应该是无法使用了。
127.0.0.1:6388> config set list-max-ziplist-entries 512
(error) ERR Unsupported CONFIG parameter: list-max-ziplist-entries
127.0.0.1:6388> config set list-max-ziplist-value 64
(error) ERR Unsupported CONFIG parameter: list-max-ziplist-value
有关quicklist的详细使用还需要查询文档和源码来研究
原文:
Redis3.2.0的cluster完全兼容Redis3.0,也就是说可以混合部署组成集群,在Redis Cluster上Redis3.2.0没有做什么新的技术,但是也有一些比较重要的事情:
注意:上述特性均在Redis3.0.7有体现,如果对于Redis3.2.0不太放心的话,可以使用Redis3.0.7。
原文:
Sentinel connection sharing不太了解,看着像是添加新的sentinel节点后,可以共享其他sentinel节点的master,对于sentinel监控多个master比较有用,这样扩展sentinel节点时候比较方便配置,有关这个后面会继续试验。


相关推荐
redis-5.0.14-1.el7.remi.x86_64.rpm安装包(含有部署手册) redis-5.0.14-1.el7.remi.x86_64.rpm安装包(含有部署手册) redis-5.0.14-1.el7.remi.x86_64.rpm安装包(含有部署手册) redis-5.0.14-1.el7.remi.x86_64.rpm...
文件夹内包括有Redis-x64-3.0.504.zip、Redis-x64-3.2.100.msi。可供大家下载安装。
windows版本的redis安装包 Redis-x64-3.0.504.msi.zip Redis-x64-3.0.504.msi.zip Redis-x64-3.0.504.msi.zip
资源在github上下载下来,包含Redis-x64-3.2.100.zip和Redis-x64-3.2.100.msi两个文件
Redis-x64-3.0.504安装包
Redis-x64-3.0.504.msi安装包
windows系统redis安装文件,Redis-x64-3.0.504(稳定版);Redis-x64-3.2.100(预发行版);redis-desktop-manager-0.9.3.817(redis界面工具)。具体安装方法详见:...
redis-5.0.5.redis-5.0.5.redis-5.0.5.redis-5.0.5.redis-5.0.5.redis-5.0.5.redis-5.0.5.redis-5.0.5.redis-5.0.5.redis-5.0.5.redis-5.0.5.redis-5.0.5.redis-5.0.5.redis-5.0.5.redis-5.0.5.redis-5.0.5.redis-...
Redis-x64-3.0.504.zip 安装包,有需要的可以下载,包内带有 一键启动,一键关闭 bat脚本
windows64位redisRedis-x64-3.0.503
windows系统redis安装文件,Redis-x64-3.0.504(稳定版);Redis-x64-3.2.100(预发行版);redis-desktop-manager-0.9.3.817(redis界面工具)。
解压Redis-x64-3.2.100.rar 到 D:\目录下 安装Redis服务 在D:\ Redis-x64-3.2.100目录下 添加服务双击redis_service-install.bat 删除服务双击 redis_uninstall-service.bat 启动服务 方法一: 在命令行...
Another-Redis-Desktop-Manager.1.6.1
Redis-x64-3.2.100.msi 和Redis-x64-3.2.100.zip
赠送原API文档:netty-codec-redis-4.1.74.Final-javadoc.jar; 赠送源代码:netty-codec-redis-4.1.74.Final-sources.jar; 赠送Maven依赖信息文件:netty-codec-redis-4.1.74.Final.pom; 包含翻译后的API文档:...
windows10亲测可用,Redis-x64-3.0.504.msi加redis-desktop-manager-2019.4.0可视化管理工具中文版
Redis-x64-3.2.100
another-redis-desktop-manager.1.5.5.exe Redis数据库连接软件,界面优美惊喜,方便好用
Redis-x64-3.2.100&Redis-3.2.100-Windows-32下载整理的windows 64位&32位包。 欢迎下载。Redis-x64-3.2.100&Redis-3.2.100-Windows-32下载整理的windows 64位&32位包。 欢迎下载。Redis-x64-3.2.100&Redis-3.2.100-...